This is the elevent installment of describing a radically more productive development and delivery environment.
The first part is here: Intro. In the previous parts I described the big picture, Vagrant and EC2, node initialization, the one minute configuration HeartBeat, HipChat integration, presence, EC2, configuring nodes, inter-machine presence, and configuring an application server and its’ stack.
It’s Alive!
We are close to having a viable semi-production environment running the latest version of our code, and with an incredible capability of configuring, controlling, and being informed of that environment. With the simple line:
1 2 3 4 5 6 | |
We got:
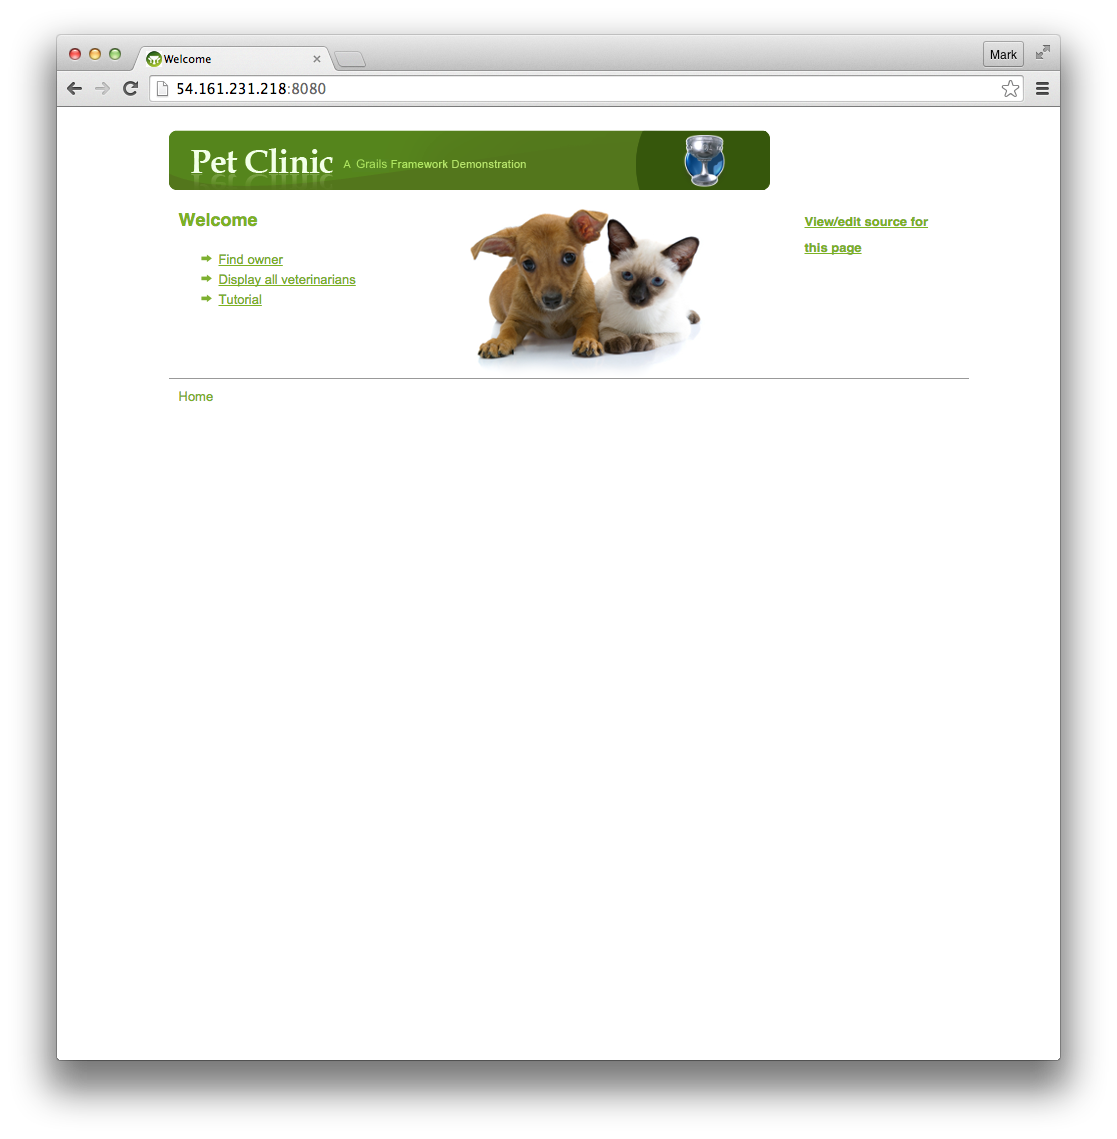
Which is almost what we want… except.
- We need that IP address to be a stable domain name
- We need the ‘clone’ to be augmented with subsequent ‘git pull’ in case there are subsequent updates
In reverse order
Pulling the Application
Going back to the one-minute heartbeat, we had this ‘cron’ job:
1 2 3 4 5 6 7 8 9 | |
Where part of the cron was described as:
1 2 3 4 | |
That is both too much code and too little to understand what is going on. It is too much because we don’t need to put anything but the first line in the ‘cron_1b.sh’. It is “fine” to do so, but if we add some new concept we have to rebuild machines (or dynamically copy in new ‘cron_1m.sh’) vs. the simpler option of just having the first ‘work’ cal the rest of the ‘work’.
The part that is too little is the part where a bunch of git repositories are getting updated. The full ‘cron_1m.sh’ looks like this:
cron_1m.sh
1 2 3 4 5 6 7 8 9 10 11 12 13 14 15 16 17 18 19 20 21 22 23 24 25 26 27 28 29 30 31 32 33 34 35 36 37 38 39 40 41 | |
The reason for the double loop is to make sure inter-repository interactions are all “at the same time”. After the set of ‘pulls’, everything is stable. We could even slow down the tempo of the system by simply pulling less often and could jitter before the set of ‘pulls’ which would jitter the whole system.
Where to work?
So if we have our ‘IT’ repo as ‘repo2_petulant-cyril’ and our application repo as ‘repo3_miniature-ironman’, where should we do our ‘work.sh’? The answer is unfortunatly simple: “where ever you want”. The more you do work in ‘repo2’ the more ‘functional’ your system. Like classic functional / imperative programming. The more you do work in ‘repo3’ the more ‘object-oriented’ your system. The more ‘repo3’ is alive vs. being acted-upon. On the other hand, the more you do work in ‘repo2’, the more you can leverage similarities in the work (like knowing directory structures, git versions, etc.) and the less ‘repo3’ is complicated by these things. Ultimately it would be ideal to be ‘aspect-oriented’ and add a ‘trait’ to ‘repo3’. But for the moment, I will keep things simple and do all the work in ‘repo2’ where depending on the kind of node you are, you know about ‘repo3’ vs. ‘repo3’ knowing it could be alive.
‘repo3:miniature-ironman’
Why does ‘repo3’ have two names? The first is a simple identifier: it is a ‘repo’ and it is the third of its kind. This simplicity makes sure things like ‘find’ produce a simple in-order answer. If we have a lot of repositories, we might start with ‘101’ to make sure sorting works for a few hundred repositories. The second part is a human-memorable name, and to help associate the repository with its purpose. You shouldn’t name a repository after its purpose, because it’s purpose could change. Outright change or simply grow. Or another repo could have the same purpose and now we can’t figure out which is right. It would be like naming a kid ‘toddler’. At first it might not even be a toddler yet, but more importantly, eventually it will clearly no longer be a toddler. And we would have a lot of ‘toddler’s so we can’t figure out which is what.
So instead, each repo just has a unique name. We have to look at it and interact with it to figure out what it is. Or each has a README that we can try to keep current.
app1/work.sh
We can fetch ‘repo3’ from ‘repo2’ within the work of an application server:
1 2 3 4 5 6 7 8 9 10 11 12 13 14 15 16 17 18 19 20 | |
The rest of the script looks identical to our main ‘work.sh’ except our directory has switched from ‘common’ to something more specific.
1 2 3 4 5 6 7 | |
And we have to push/pop to get in the right directory for the ‘GIT’ commands to work.
1 2 3 4 | |
Start / restart
Ultimately we will run from a Tomcat or similar container, but currently we just have to:
1 2 3 | |
Except for a couple issues
- We would like the error and standard output to go somewhere in case something goes wrong
- We need to not collide with an previous ‘run’ because they hold onto the same port
Solving these is pretty trivial if we are allowed to be ‘brutal’ and accept downtime. Ultimately this won’t be a problem because we will first ‘shutdown’ and let the load balancer pull us out of rotation before we actually upgrade versions.
Launching
Making something into a daemon is a common approach, but an even simpler approach is just redirect stdout and stderr on a detached process. Trying this from a terminal appears to not work, because everything is a child of the terminal login process. But to get out of that problem, you can just use ‘screen’ and create a non-terminal-connected screen.
1 2 3 4 | |
This is just for testing with a manual launch. Our cron job doesn’t have this issue and can start and restart things without the extra effort.
Logging
The heartbeat cron job has its own logs, so everything would appear there by default. We can change the destination to something more informative / isolated by redirecting stdout and stderr. Ultimately we would use a logging framework and infrastructure (e.g. Graylog) to get everything off the machine and into a central logger.
Killing
Again, because we will ultimate decommission ourselves, we can be quite brutal to the running application. Whenever we are going offline, we mark ourselves as decommissioned and drain out all ‘clients’. For a web server this is very quick. For other servers (like a game server with shared game state), this can take a while. So the states are:
- Running
- Add Users
- Keep Steady
- Drain Users
- Decommissioning
- Drain Users
- Drained
- Decommission
- Graceful shutdown
- Kill application
The last one is the critical one. Although ‘tomcat’ and others have a graceful shutdown, it does not always work. We must be able to decommission properly, or we have to kill the application. If we can’t decommission a node successfully, we can not bring it back to ‘running’ and so our instance pool has shrunk. Ideally our infrastructure recognizes this and either (a) kills the node or (b) marks the node as permanently unavailable and bumps the count of expected nodes in the array (say from 4 to 5 to include one being permanently unavailable). The benefit of ‘b’ is we can investigate the node later. But either is operationally reasonable.
So for the moment, lets just do the last one to decommission:
1 2 3 4 | |
Are we alive?
Finally, we should at least reasonably check whether we are alive with the new version. The load balancer is checking our URL, so it knows. But the load balancer can’t tell the world (HipChat) whether the deploy was successful.
A simple ‘curl’ to our local port can though.
1 2 3 4 5 6 7 8 9 | |
DNS Stability
The DNS stability is a trivial thing on EC2 and basically any modern DNS system. Trivial as long as we understand one fatal flaw:
- Everyone caches
We can have stability so long as we accept that everyone is trying to cache the DNS to IP address for as long as possible. This can be minutes or even longer in spite of our DNS records saying otherwise. This is actually one of the reason load balancers are so important. Load balancing is a very simple concept. Your load balancers should be simple enough to ‘keep running’ and be rarely flipped. So their IP addresses will be stable: like the person who is always hanging out on their front porch. You can always find them there and ask them to ask someone else a question. They will take care of the rest.
So ultimately we don’t want the application server obtaining a domain-name, we want it to register with a load balancer. But for the moment (and for some useful internal capabilities) we will have each application server take-a-name.
How to take a name?
Before the cloud, the common ways to take a name were:
- To assign a name via the console of the domain name server
- To dynamically attach an IP address to a name via various protocols
Pre-cloud, these work fairly well. If you DN server is smart enough, it can take failed servers out of rotation with a health check. And even early versions of cloud computing used a similar model where servers took possession of a pre-allocated IP address that the DN server knew about. But these models don’t scale as well as a much simpler model. Route-53.
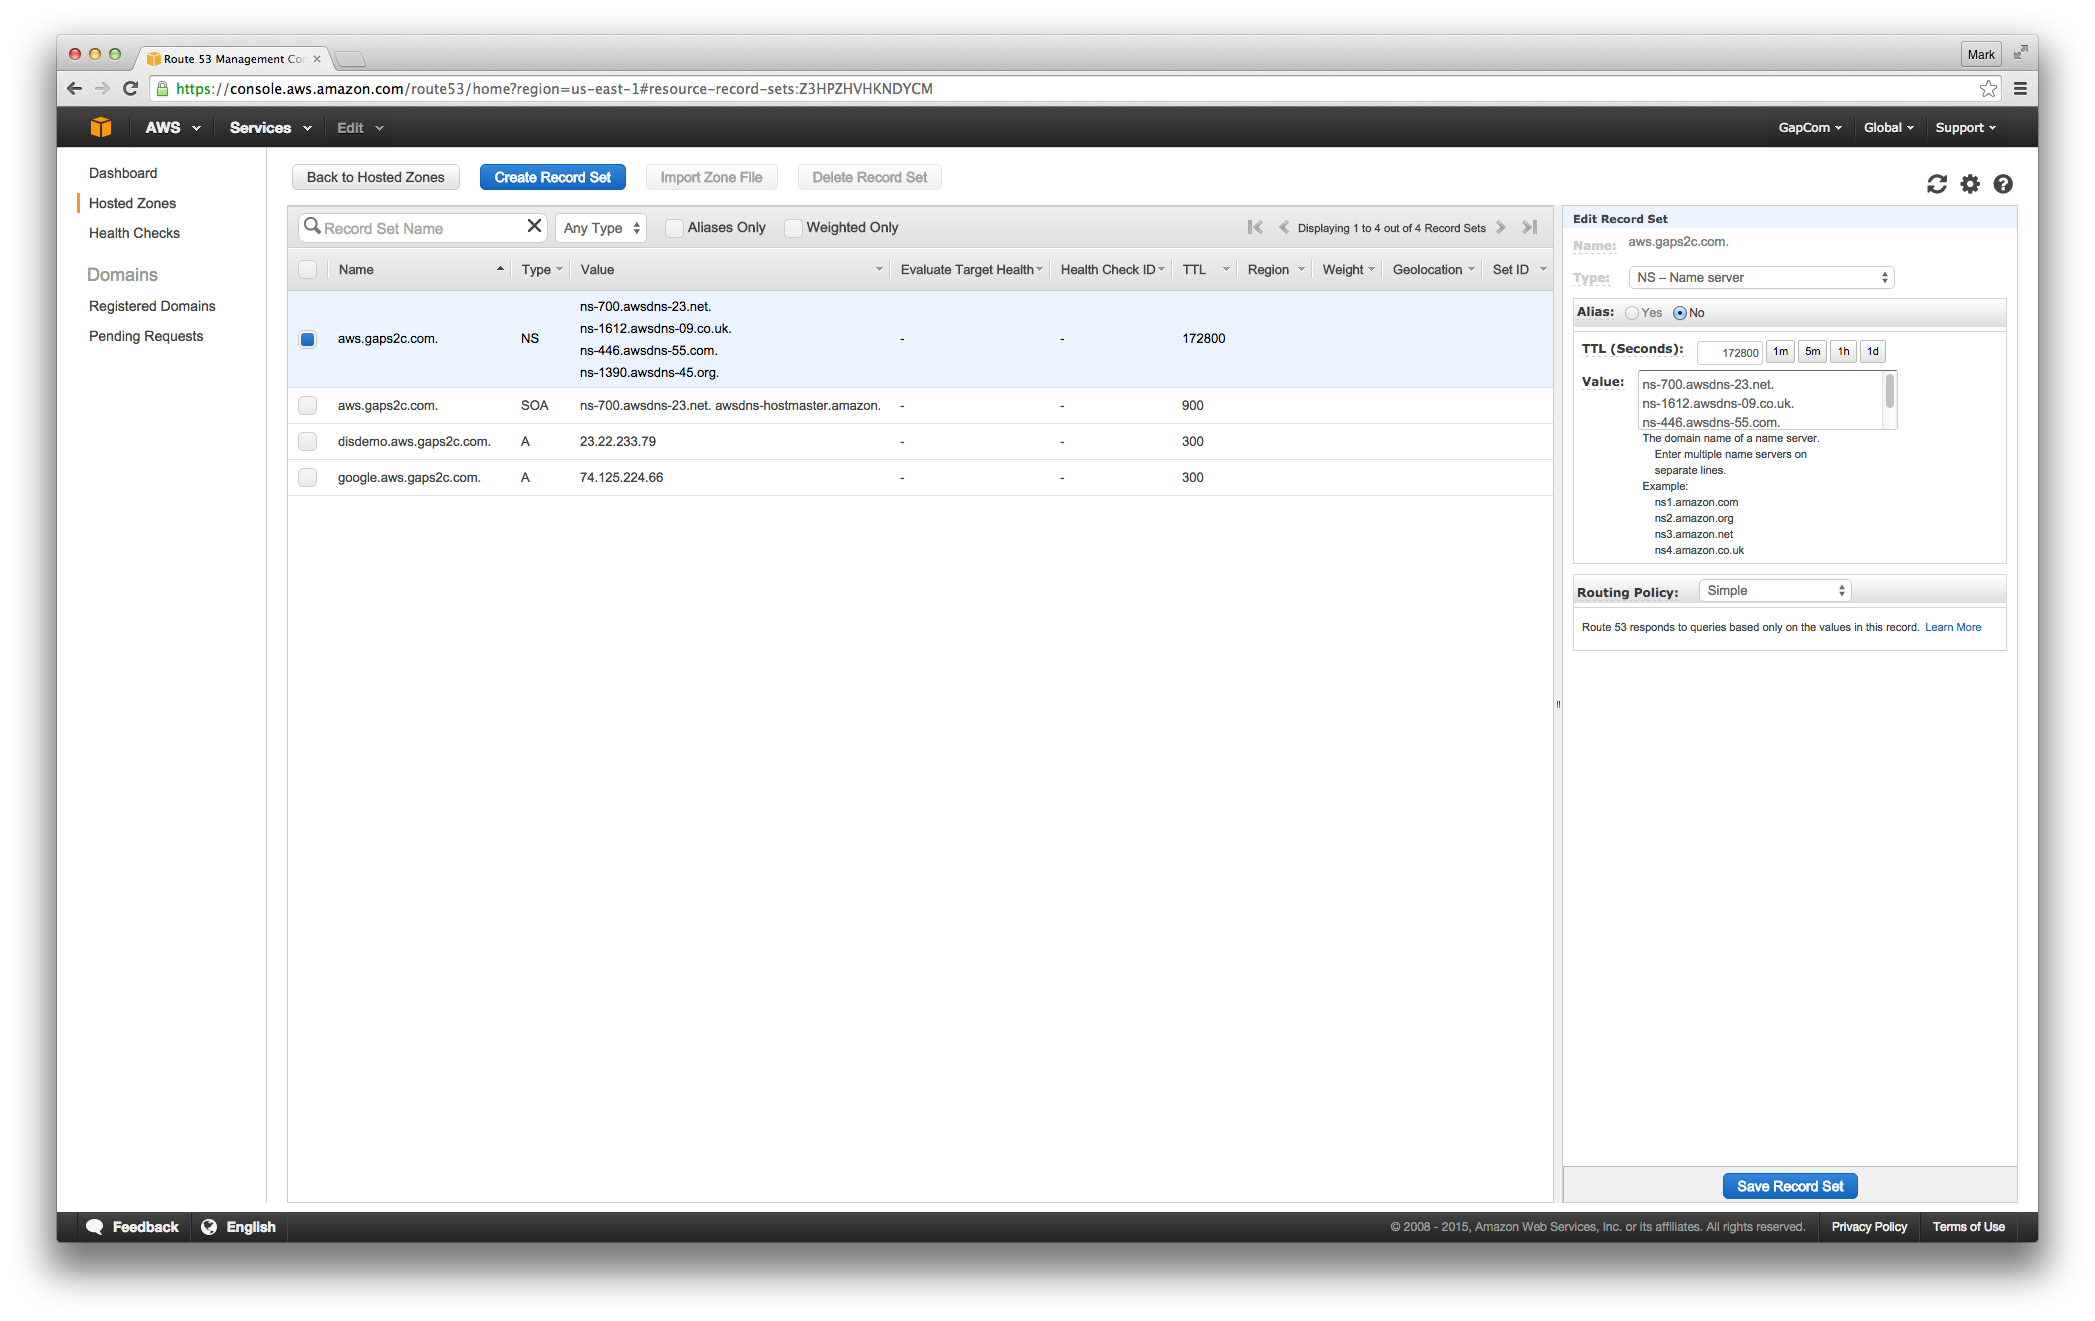
Route-53 takes the ‘dynamically’ to a whole new level. You can dynamically add / change / delete most anything and the common latency for the change to take affect is very short. The rest of the world still caches but at least you know the DN servers are up to date. In the following, you can see the ‘gaps2c’ project I created a while ago as a demonstration of this ability. The main domain registry for ‘gaps2c.com’ is elsewhere, but the subdomain of ‘aws.gaps2c.com’ is managed by route53. The last entry works and says google.aws.gaps2c.com knows where the google servers are.
Registering with Route-53
There are a lot of ways to register with Route-53:
- Via the console
- Via an XML-based payload update
- Via adding some elements to a CloudFormation
The first is easy, but not scalable. The second is not hard, but a bit ‘peculiar’ in how the payload works. The third is trivial and scalable.
So lets start with the third
Registering via a CloudFormation template
The good news is it is simple in a CloudFormation. The bad news is it requires a bit more infrastructure to appear, so it isn’t a one-liner. The issue with CloudFormations is that they must be complete. They can only auto-wire things they know about. So they are relatively monolithic. It is possible to compose them somewhat, but that is really just embedding one formation into another vs. wiring two independent formations up. Ultimately to wire up independent formations, you need to ‘know what you said’ and tell two or more formations enough information that they can find each other. That is not hard but it isn’t free.
But for free, we can add three things to our application stack and get a DNS registration for our application tier.
- A HostedZone entry – Pointing into the Route 53 database
- An ElasticLoadBalancer – Which enables the CloudFormation to know about IP addresses
- A PrimaryDnsZone – Which defines the FQDN of the application tier
And we need to augment our AutoScalingGroup to know about the ELB. Adding all this gives:
1 2 3 4 5 | |
1 2 3 4 5 6 7 8 9 10 11 12 13 14 15 16 17 18 19 20 21 22 23 24 25 26 27 28 29 30 31 32 33 34 35 36 37 38 39 40 41 42 43 44 45 46 47 48 49 50 51 | |
After adding all that, we get a new Route53 entry

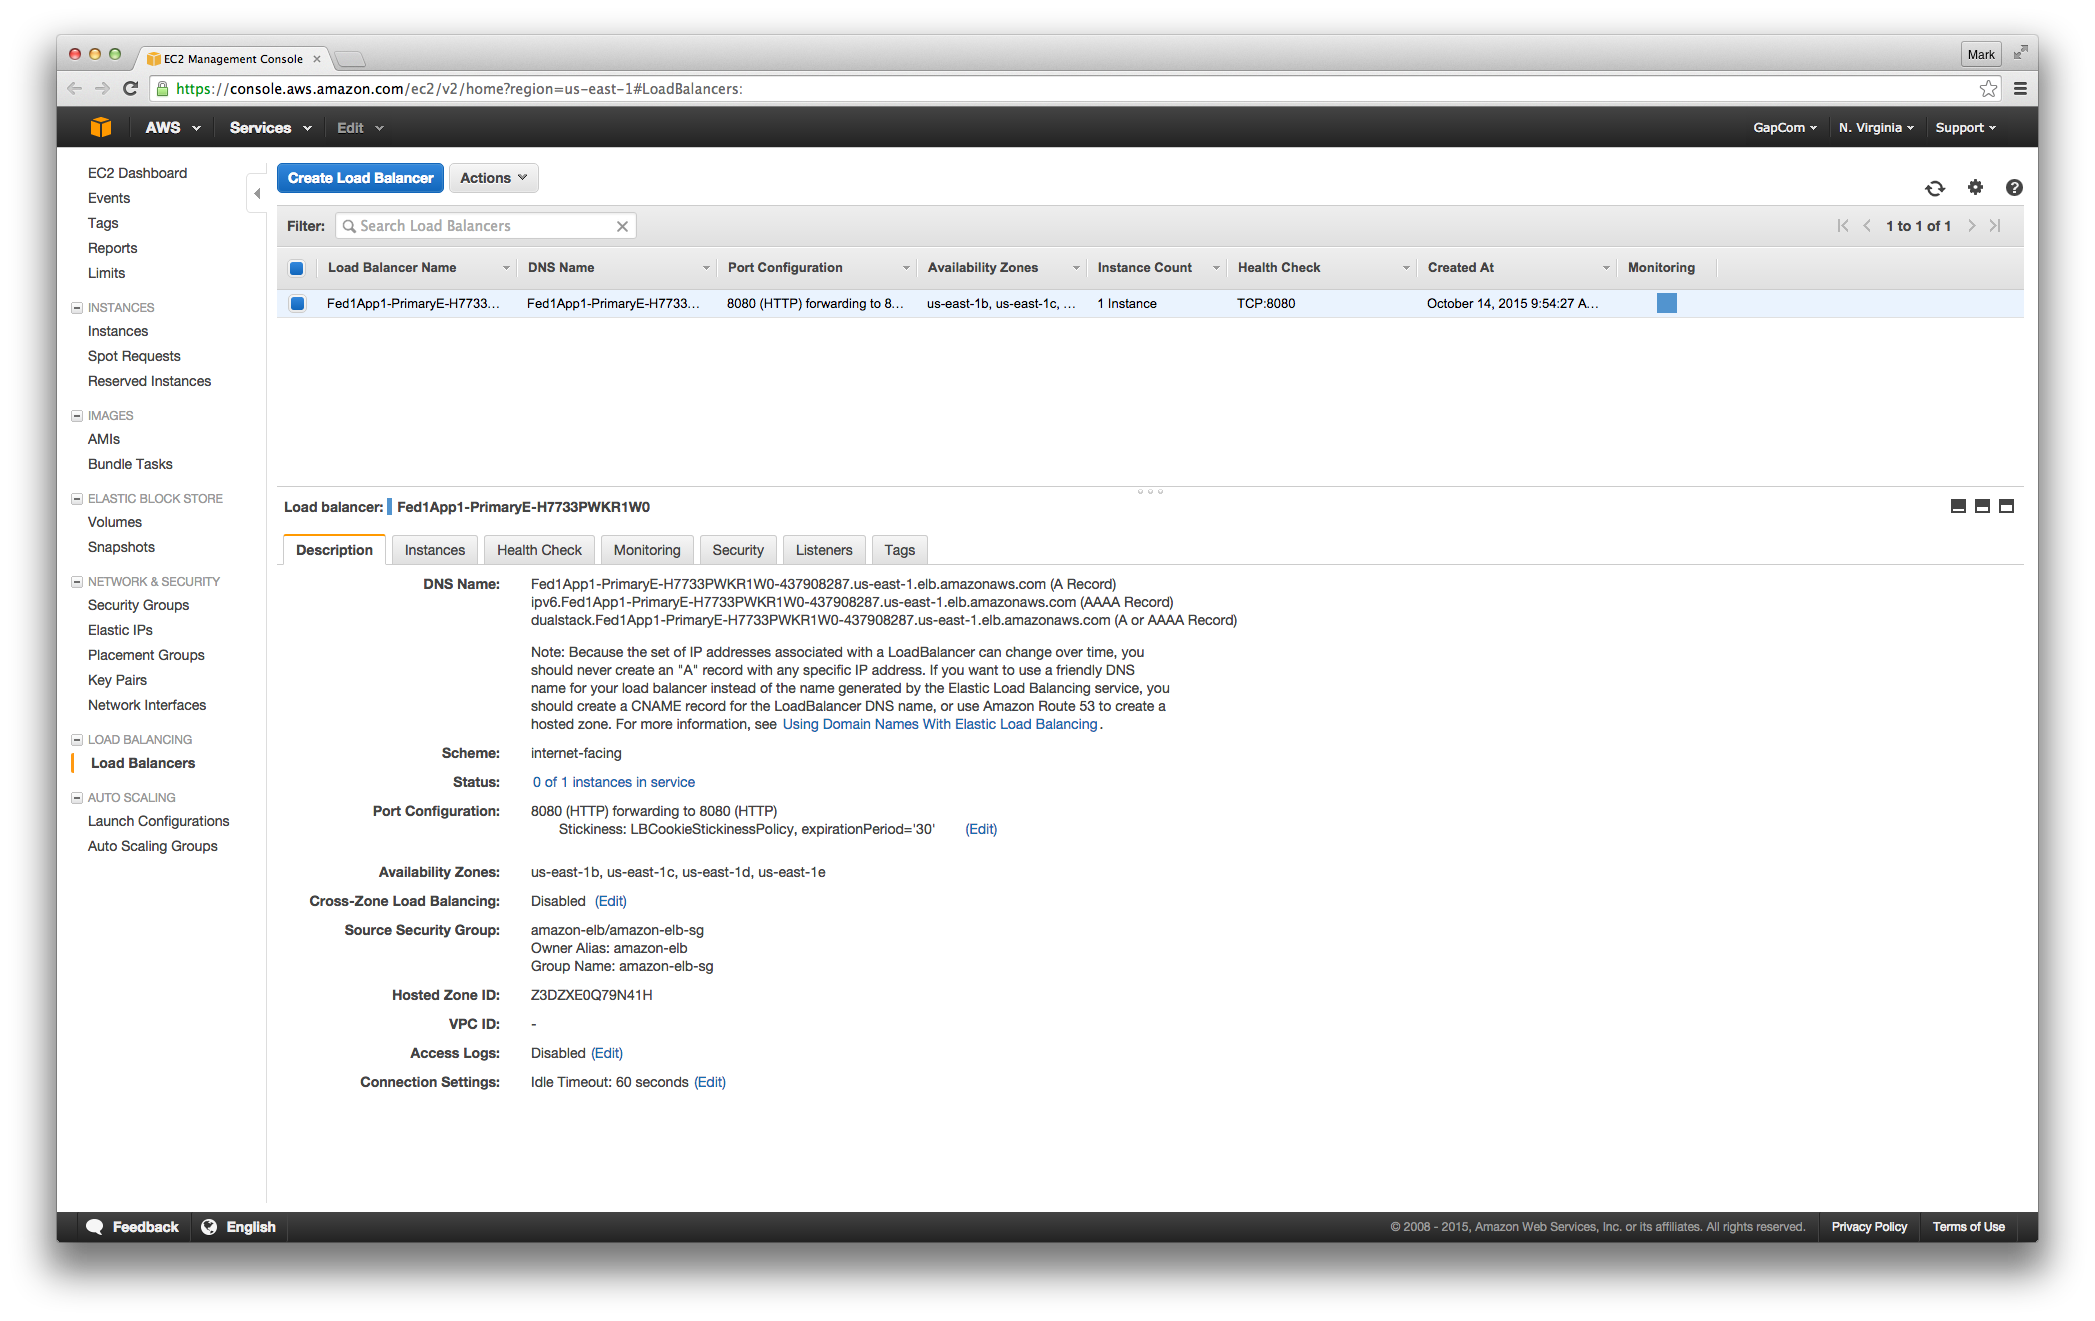
And can also look at our load balancer:
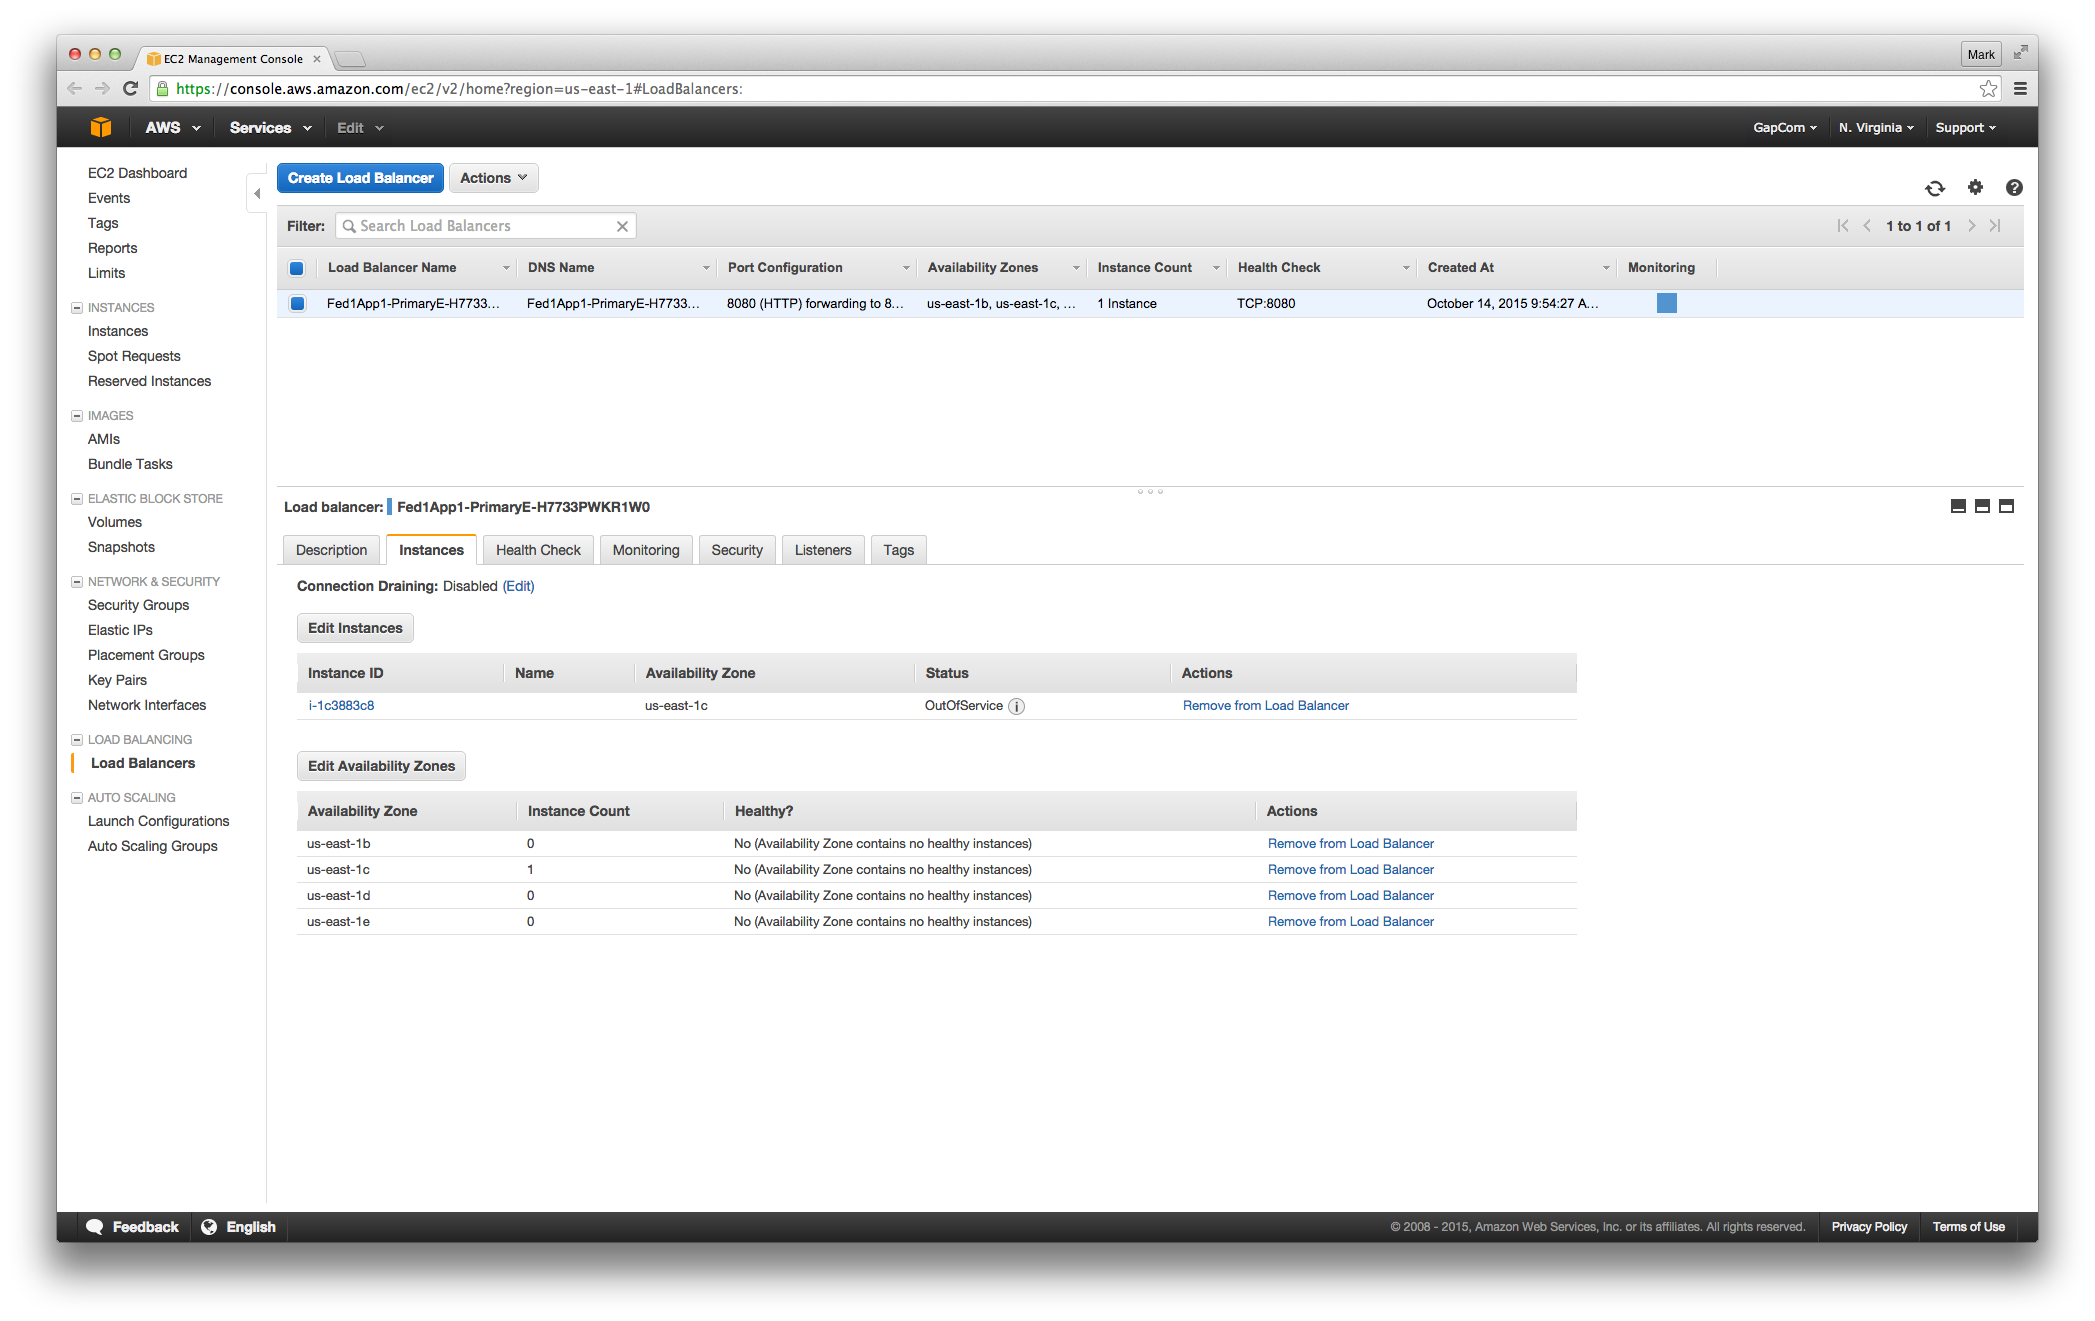
And the instance associated with it:
And the rule we use to figure out whether the instance is alive
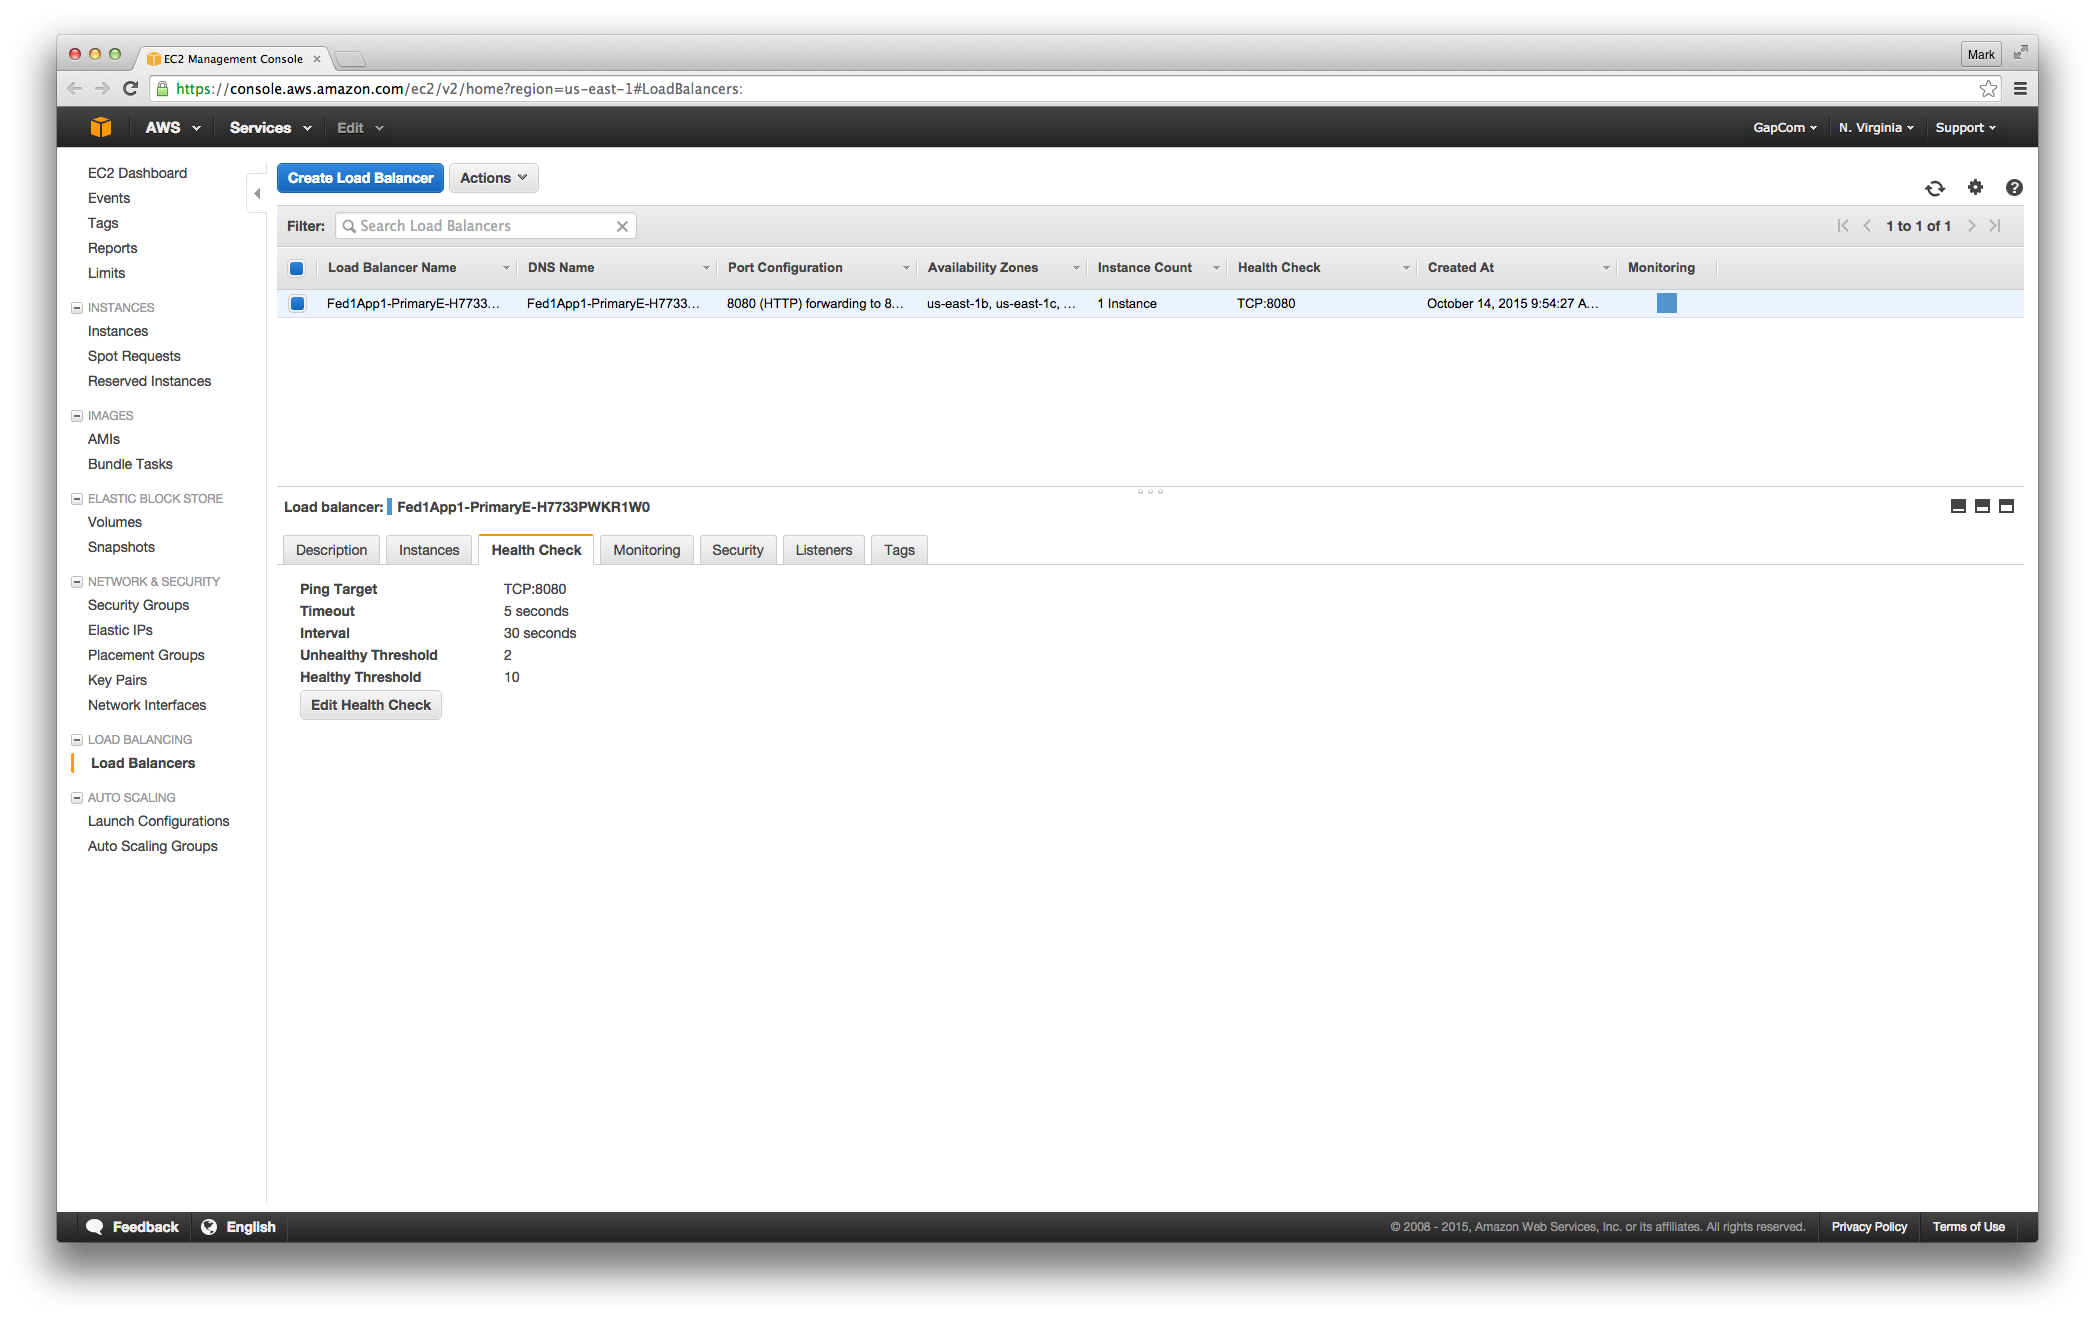
Voilà!
Domain-Based, Auto-Scaling, IT and Application Stack
We now have a stable domain name for our stack: ‘fed1-app1.aws.gapcom.com’
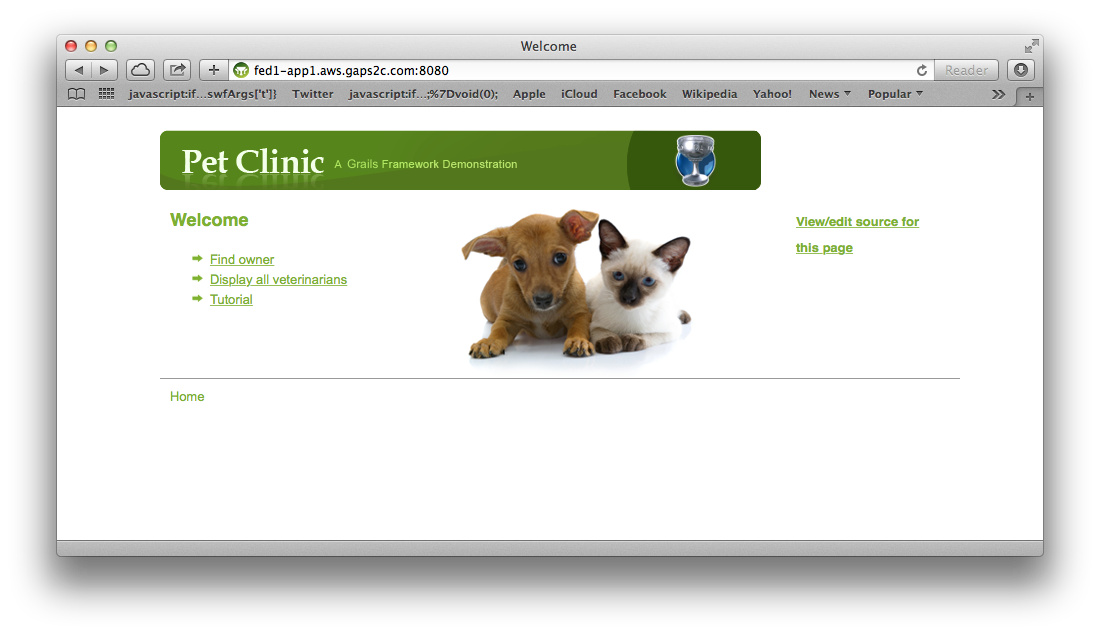
which can scale up and down machines automatically. Ideally there are at least four in production to make sure all the availability zones under ‘US East’ are covered. But for anything else, one or two is sufficient depending on what you are testing.
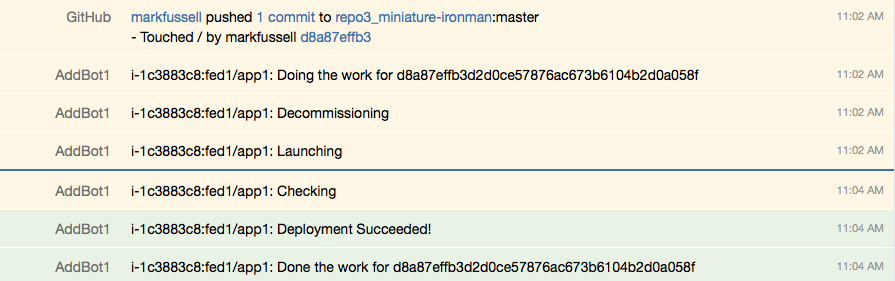
Autodeploying IT and Application
We now have a completely automated upgrade system for both our IT (servers) and for the applications those servers are running. Whenever we touch the code base and ‘push’ the changes so the servers can see/pull them (PushMePullYou), they automatically decommission, deploy and confirm the deploy was successful.
What Next?
Basically nothing is left for the core of the ADD. This series has described how the four ingredients are cooked/hooked together and shown what that looks like on EC2. Other topics are just filling in details that are really just nuances and flavors of the ADD. For example:
- What is the Grails application stack like?
- How does Vagrant handle the one minute crons and other more advanced features?
- Should you develop in Vagrant or on the host operating system?
- Answer: Either depending on what you are doing and how productive you are, but the closer you are to production, the more likely you are to catch issues
- How does HAProxy and the database configuration using presence work?
- What about NewRelic and other monitoring tools
- Where is Angular in all this?
The first and last topic I will cover in the next multi-part series called the ‘AddStack’. The others are more specific topics that I may get to eventually, but are not critical to understanding and using the ADD.