This is the second installment of describing a radically more productive development and delivery environment.
The first part is here: Intro, but to summarize: since the 1970s, the most productive way to develop and deliver software was present in Smalltalk, Lisp, and other languages (Mesa/Cedar at Xerox) by using a very simple and powerful model. You take a computer with a fully running environment, you tweak it, and then you clone that. This way you: (a) minimize what could go wrong, and (b) maximize what will continue to work. It is very tangible and very instructive (you have full source for everything that is running). You tweak other people’s masterpieces until they do what you want, and you learn from their masterpieces to create your own.
ADD: How Better?
As described before, ADD has four ingredients:
- Amazon EC2 http://aws.amazon.com/
- Amazon S3 http://aws.amazon.com/
- GitHub.com http://github.com/
- HipChat http://HipChat.com/
And these are hooked together to enable ‘Changers’, ‘Watchders’, and ‘Machines’ to be super-productive. How is the ADD more productive than the tweak and clone model? It is because it solves the core problems of the clone model:
- How do we clone to different environments? Different hardware or configuration changes?
- How do we reduce the amount of information we have to clone?
- How do we reduce the time it takes to transport the clone?
- How do we know what version of the clone is on any machine?
- How do we create thousands of clones?
- How do we know what is different about the different clones?
- …
The first three ingredients are the most powerful and enables a fantastic improvement to the tweak and clone model. The last ingredient is mainly for people to be able to enjoy the ADD more easily. It is like the ‘salt-to-taste’ and how much you integrate HipChat in with the rest of the ecosystem is up to your team. But the more it is integrated, the more your team will know what is going on, the more easily your team will solve problems/issues, and the more easily you will onboard new people.
ADD: GitHub
GitHub will become your primary resource for everything related to ‘information’. Human notes… go into GitHub in Markdown format (like this blog). Meeting notes. GitHub. Images to go with Meeting notes. GitHub. Your first, most important, repository will be called ‘repo1’ and will be all the notes you want the team to see. No more arguing about the best Wiki, blogger, file store, etc. The answer will always be the same. It is in GitHub. Because everything is in GitHub.
Why? Because it is simple. It is accessible. It is powerful. Keeps history. Takes almost no space. It works offline (on an airplane). And it works with multiple writers. And if GitHub dies… you have a complete copy of everything you need to bring up your own ‘Git’. Asking ‘Why?’ is silly. First move to GitHub for all of this, and then ask ‘Why?’ to everything else.
ADD: S3 : Annexed Repositories
Git and GitHub are not good with large binary assets. They get stored in a notably raw way and just make the repository huge for no benefit. So don’t store large binary assets in GitHub. Instead store a reference to the binary object up in S3. Retrieve it as needed. See Annex
ADD: EC2 and Vagrant and GitHub and S3
Using EC2 and Vagrant with a ‘PushMe-PullYou’ model (see PushMePullYou) solves a host of development, delivery, and operations issues. The benefits are:
- Complete version control of machines – both operations and developers’ machines (or part of a developers’ machines)
- A very simple model that enables machines to be provisioned rapidly and to change their state every minute (if needed)
- An impressive fan-out of activity
- An ability to work offline (say GitHub goes down) or to have complete redundancy (use both GitHub and BitBucket to avoid SPOF)
- Inherently no SPOF
- Dependent on nothing - Not EC2, Not Vagrant, not GitHub, not S3. These may be gold standards, but they can all be swapped out
This is where the ADD just shoots through the roof. The ADD uses particular technology to show “How it is done” and get you doing it right. But it is not dependent on those technologies. No Chef. Unless you want it (and I recommend ‘Solo’). No Linux unless you want it. No Grails or Groovy unless you want it. Use Google Compute if you want to. Or even your own Big Iron. The ADD is a set of tools and methods that work well together and is most easily seen with the Gold Standard. But it is beyond them: like a mathematical formula (the Golden Ratio) that can be present in many forms.
Demo or Die!
The core demo for this article will walk through bringing up a server on EC2 and Vagrant. If you are not familiar with EC2 and Vagrant, please read some of my other articles or meeting notes, or look to the web for resources.
Vagrant
The demo in Vagrant is slightly simpler than in EC2 because you are dealing with a machine at a time. On EC2 you should be thinking ‘Clusters’ of machines that work together in ‘Federations’, and the technology to do that is more complicated and more EC2-centric.
In Vagrant, you have a ‘Box’ definition and then an actual virtual instance. To provision an instance you have to ‘init’ it, bring it up, and then configure it. Except you don’t. As long as the instance knows how to bootstrap itself. Demo:
Vagrantfile
1 2 3 4 5 6 | |
As the last step of the Vagrantfile, the (linux) server does three things:
- It ‘shapes’ itself to be a ControlServer
- It ‘shapes’ itself to be ‘bot1’ for it’s credentials
- It configures itself with a boot script
By the end of the boot script it will be fully alive and running. Watching for changes to repositories that indicate it should do something. You should never have to SSH into the machine… ever. You can to look around (like the Magic Schoolbus) but you should treat it like it is a living creature and never touch anything inside it. If you have to touch something, fix the ‘DNA’ (that boot script), kill the server, and launch a new one.
Given this is a Vagrant file on the developer’s machine, they can certainly feel free to fiddle with things. But that is to learn to understand the server. Some EC2 servers may even be for ‘fiddling’. But QA and production servers should never be touched and should only be looked at if they are confusing people (who already understand the fiddling and Vagrant servers).
Both ‘ControlServer1.sh’ and ‘cred_bot1.sh’ simply put information into files under ‘/root/nodeinfo/’. This is an amazingly flexible approach that works very simply for Vagrant and EC2.
ControlServer1.sh
1 2 3 4 5 6 7 8 9 10 | |
cred_bot1.sh
The actual version of this would contain real credential information. The actual version would be developer-specific and not in version control.
1 2 3 4 5 6 7 8 9 10 11 12 13 14 15 16 | |
centos7a_boot1.sh
This script mirrors most of how EC2 works: we need this machine to be able to checkout a repository from GitHub but we only have Amazon credentials. So we put the full credentials into S3 and check them out. Then we can clone the ‘repo2’ provisioning repo and go from there.
1 2 3 4 5 6 7 8 9 10 11 12 13 14 15 16 17 18 19 20 21 22 23 24 25 26 27 28 29 30 31 32 33 | |
Directory Layout
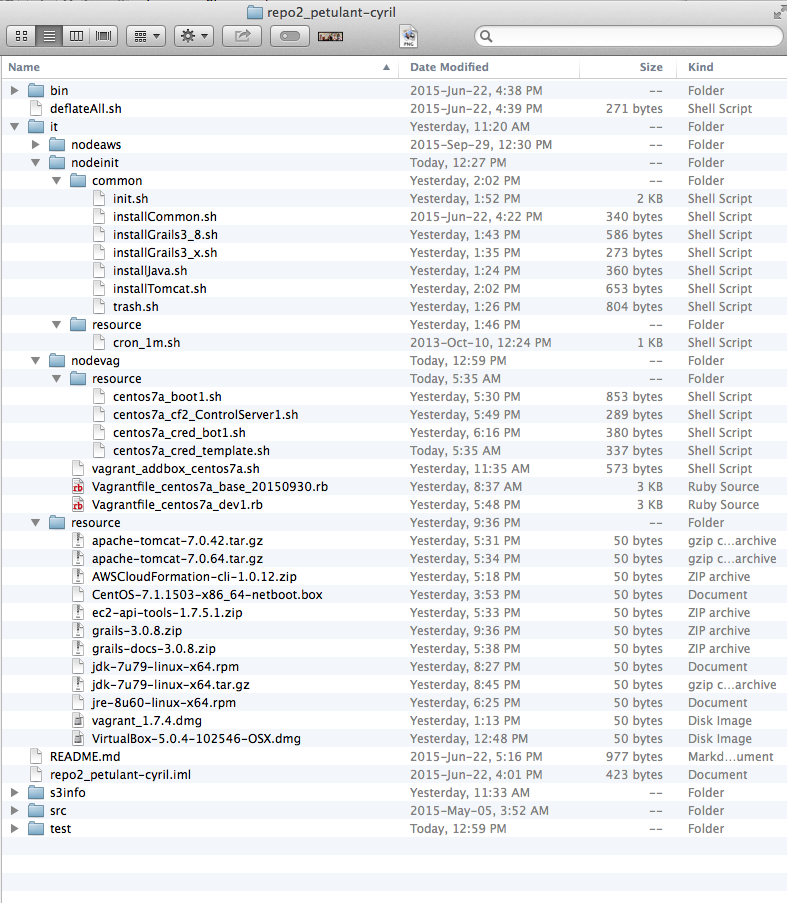
An image of the directory structure is below. The little-meaning but organized name ‘repo2’ is augmented with a human suffix ‘petulant-cyril’ to make it unique and memorable. ‘repo2’ is always the first operations repo and ‘repo3’ is always the first development repo. The suffix is generated by GitHub or other name generators.
The layout of the directory contains a few things:
- A ‘bin’ that contains scripts that can be run within this repository. The ‘deflateAll.sh’ script is important enough to be put in the root, but the rest are inside ‘bin’.
- All things other than the README and deflatAll should be in consistent subdirectories. The ‘s3info’ is for the annex. And ‘it’ is for everything related to being it. ‘src’ and ‘test’ are meaningless at the root level and should not be checked in.
- You can see the ‘node’ folders. A ‘node’ is a virtual server (Chef and others terminology). ‘nodeaws’ is for aws related node configuration. ‘nodeinit’ is common. ‘nodevag’ is for vagrant. ‘resource’ contains resourceds in general if under ‘it’ and for something more specific if lower
- folder names are never capitalized or pluralized to avoid inter-operating-system issues. File names can be any format, but I use augmented CamelCase (with snakes) or snake_case depending on the situation.
- You can see the annexed files in the ‘/it/resource’ folder. They are all ‘50 bytes’